Journal With Me | Travelers Notebook
- Helen Colebrook
- Jun 7, 2022
- 2 min read

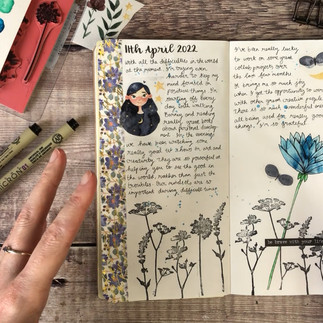
In today's blog post, I am going to guide you through the step by step process for creating this journal spread. I used a plain insert, which I keep inside my standard size Travelers Notebook cover from Start Bay Notebooks.
*You can click any of the images below to enlarge them.
Step 1: Start off by sketching the outside petals of your flower. I'm using a Sakura Pigma Micron pen which is waterproof.
Step 2: Carry on adding petals and the stem until you have the full shape of your flower.
Step 3: Add thin lines to the petals for detail and bolder lines for depth.
Step 4: Next, add some colour to your flower. I am using Kuretake Gansai Tambi watercolour in my journal.
Step 5: For a pretty border, I added some London Gifties washi tape along the edge of both of my journal pages.
Step 6: I then added some stamping of flowers along the bottom of my pages. I used Tim Holtz Wildflower stamps.
Step 7: It's also a lovely addition to add some watercolour splashes across your journal pages.
Step 8: I always enjoy adding a quote to my page. For this I used the Tim Holtz Small Talk sticker book.
Step 9: I finished off the decorative elements by cutting images out of washi tape to use as stickers.
Step 10: For writing inspiration I used prompt 262 from my new book, which is "what little things did you notice today that are worth remembering?"
Steps 11 & 12: Fill in the empty spaces on your journal page with writing.
*Some of the links contained within this blog post are affiliate links. This means that I earn a small commission if you chose to make a purchase, at no additional cost to you.
Special offers: Start Bay Notebooks: use the code JWP10 for a 10% discount on journal covers
London Gifties: Use the code HELEN for a free roll of JWP washi popped in with your order.
I really hope you enjoyed this blog post. If you would like to watch a process video of this journal page coming together, then you will find it down below, Helen x


