
30 Layers in One Art Journal Spread
- Helen Colebrook
- May 9, 2025
- 4 min read


I've recently finished working on a creative project where I added one layer to an art journal spread each day throughout April. I know that many of us are often short on time and I wanted to see what five minutes per day could achieve over the course of one month.
I set the challenge on Patreon for each of us to add just one element that we felt drawn to or that represented something from our life each day. The aim was not to worry about the end result, but just enjoy the process and embrace some quick creative play.
In this blog post I am going to share each of the layers I added so that you can see how this art journal spread came together.
*you can click on any of the images to enlarge them.


Day 1: I wrote out the thoughts that were swirling around in my mind which is one of my favourite ways to start an art journal page.
Day 2: I glued down some pieces of paper and mesh, with a few strips of washi tape.
Day 3: I used my chubby Stabilo Woody pencils to add some mark-making on my pages.

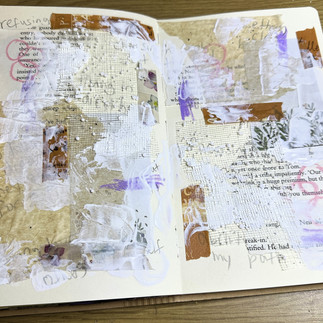


Day 4: I added some thick layers of white gesso using a palette knife to start building up more texture on my pages.
Day 5: I dropped some sepia acrylic ink onto patches across my pages which I then spritzed with a water bottle to encourage it to run and spread.
Day 6: I added some stamping using a black Staz-on ink pad.


Day 7: I started bringing more colour onto my pages by adding splotches of blue watercolour paint.
Day 8: I used my fingers to smear some pale blue acrylic paint across both pages.
Day 9: I added some darker blue acrylic paint in stripes using a paint brush.


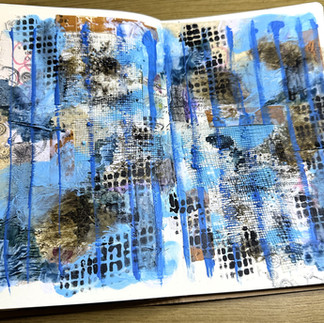


Day 10: I used some black charcoal to add smudges on my pages.
Day 11: I applied black acrylic paint through a stencil in quite a few places. You never quite know what is going to be showing by the time you have finished working on your art journal pages.
Day 12: I added some white acrylic paint using a brayer to start muting down some of the background.


Day 13: As I started to near the mid-way point of this project I began to consider what decorative elements I would like to be showing by the final layer. I decided to add some watercolour leaves, focusing more around the outside of the pages.
Day 14: I added some small blue watercolour flowers.
Day 15: I wanted to bring a little more calm to my busy pages, so I added some more white acrylic paint, using a brush this time.


Day 16: I've now started thinking about what other colours I would like to use and decided to add some pink gloss medium for dots and to add the word "love".
Day 17: I used some pink distress ink through a stencil, again concentrating around the outside of my pages.
Day 18: I used a yellow Inktense pencil to draw circles around the pink dots.


Day 19: I used a yellow Neocolor II crayon to add some short lines.
Day 20: I've now started thinking about a focal point and cut out an image from a magazine. I left this loose on my page throughout the day so that I could consider whether it was the one that I definitely wanted to use.
Day 21: I decided to cut a dragonfly sticker in half and add those behind the image of the girl to give her wings. I then added the image to my page.

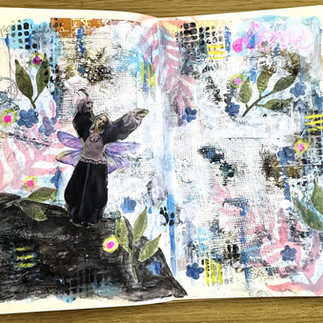


Day 22: I used a black Intense pencil to help "ground" my focal image, so that she was no longer floating in mid-air.
Day 23: I added some white circles using acrylic paint on my right-hand page as I want a calmer space to add a quote.
Day 24: I used a black inktense pencil inside the circles to help balance the right-hand page with the left.


Day 25: I added a quote from my Patreon printables. I felt it was perfect to tie in with this project that took 30 days to complete.
Day 26: I used a white gel pen to add details to my focal image and a little writing along the bottom of my page.
Day 27: I used a black pencil to draw a border around both pages to help bring them together.


Day 28: I added some journal writing inside the white circles.
Day 29: I used my white gel pen to add some details inside the leaves and flowers.
Day 30: I finished off by adding some gold splashes all over my pages.
I had so much fun with this art journal project and it was a really lovely reminder of how valuable it can be to take your time with things. I will miss having the consistency of working on this in my daily routine, so it's definitely an idea that I will return to again.
I hope you've enjoyed reading this blog post and that it gives you some ideas for your own journal pages too, Helen x
*Some of the links in this blog post are affiliate links. This means that I earn a small commission if you choose to make a purchase, at no additional cost to you.

I would love to welcome you to my journaling club over on Patreon.
I share monthly journal prompts, creative challenges, journal printables, tutorials and weekly journaling videos. It's a really lovely community of supportive people.
Thank you so much for setting the 30 day challenge out like this Helen. This is so helpful for someone like me that finds collaging so difficult. Your end result is so very beautiful. 😍